Setup for Rails + Webpacker + React + React Router + Typescript
Sample Repo: https://github.com/cliche818/react_router_ts_test The readme for that repo has links to several guides I used to create my project.
This guide is meant for new Rails project and assumes reader has experience with Webpack, React, and Rails before.
Not an in depth guide, more like a reference…for myself lol.
General Steps to setup Webpacker (v3.5) + React(v16.8) + React Router(v4.3) 1)
rails new [INSERT_APP_NAME] --skip-coffee --skip-sprockets --skip-turbolinks --webpack=reactNo need for asset pipeline related files, Webpack replaces this.
Important Files:
- package.json - where you put all your node module dependencies (yarn add will edit this file)
- webpacker.yml - the equivalent of Webpack’s base.config.js
- config/webpack/environment.js - the other portion of Webpack’s base.config.js (use development.js or production.js for difference in environments)
- hello-react.jsx - default entry point to display react components
Follow tutorial created by someone else: https://www.youtube.com/watch?v=5F_JUvPq410
More details on other files, read this guide (only part 1): https://evilmartians.com/chronicles/evil-front-part-1
2) Edit this file: app/views/layouts/application.html.erb Add
  <%= javascript_pack_tag 'application' %>
  <%= stylesheet_pack_tag 'application' %>
This is to tell the view to use the file generated by Webpack/Webpacker
3)
yarn add react-router-domFollow Part 2 of the Tutorial by someone else: https://www.youtube.com/watch?v=hBm5M4u2jLs
4)
bundle exec rails webpacker:install:typescript
yarn add @types/react @types/react-dom
Rename all jsx files to tsx: hello-react.jsx to hello-react.tsx
Further reading: https://github.com/rails/webpacker/blob/master/docs/typescript.md
Parsing Json in Terminal
I have a problem at work where I want to see how many retries one of our process is taking. Yroo logs each request to our backend, but it is mixed in with all the other logs from other processes. Also, I would like to see it table with two columns, retry count and number of occurance in log
The specific log lines I am interested are partially in JSON like this:
2018-10-18 18:48:53 +0000 severity=INFO, [BrowserExtension][ProductLookup] {"initial_scraped_data":{"price":{"currency":"CAD","current":"179.99"},"reviewsCount":"0","identifiers":{"mpn":"84978"},"country":"ca","hostURL":"https://www.canadiantire.ca/en/pdp/canvas-caleb-dinnerware-set-32-pc-1422781p.html#srp","retry":6,"extension_api":{"price":{"currency":"CAD","current":"179.99"},"reviewsCount":"0","identifiers":{"mpn":"84978"},"country":"ca","hostURL":"https://www.canadiantire.ca/en/pdp/canvas-caleb-dinnerware-set-32-pc-1422781p.html#srp","retry":6},"logger_uuid":"69ae6de1-4bc4-4b5a-b252-f03424c3cbc0"},"product":{"price":{"currency":"CAD","current":"179.99"},"reviewsCount":"0","identifiers":{"mpn":"84978"},"country":"ca","hostURL":"https://www.canadiantire.ca/en/pdp/canvas-caleb-dinnerware-set-32-pc-1422781p.html#srp","retry":6,"extension_api":{"price":{"currency":"CAD","current":"179.99"},"reviewsCount":"0","identifiers":{"mpn":"84978"},"country":"ca","hostURL":"https://www.canadiantire.ca/en/pdp/canvas-caleb-dinnerware-set-32-pc-1422781p.html#srp","retry":6},"logger_uuid":"69ae6de1-4bc4-4b5a-b252-f03424c3cbc0"},"lookups":{"combined":{}},"stats":{"name_found":false,"identifier_found":false,"ebay_product_found":false,"upc":null}}First I have to lob off the non JSON part and filter out only ProductLookup logs. I used this command to generate a new file with only such records
cat input/Oct20/last24_rails.txt | grep ProductLookup | cut -d "{" -f 2- | awk '{print "{"$0 }' > input/Oct20/productlookup.jsonThis line does the following: 1) read out last24_rails.txt where all the logs of the day are saved 2) return lines with ProductLookup 3) return only lines after the first “{“ character 4) append “{“ that I chopped off previous 5) write to a new file called productlookup.json
Now that I have a json file, I am going to use jq to parse the file
jq input/Oct20/productlookup.json

jq: error: Oct20/0 is not defined at <top-level>, line 1:
input/Oct20/productlookup.json
jq: error: productlookup/0 is not defined at <top-level>, line 1:
input/Oct20/productlookup.json
jq: 2 compile errors
I got errors when I just tried parsing, turns out some of the log are truncated so the JSON is invalid
cat input/Oct20/productlookup.json | jq -R '. as $line | try fromjson catch $line | try .initial_scraped_data.retry catch null' | grep -v null | sort | uniq -cUsing the above line I am able to ignore broken json lines with jq -R option to read the line as text and using fromjson to parse it. Ignore all nulls, sort then using the uniq command to get the count. The output is
167 1
4   2
10  6
Which is exactly what I am looking for.
Update on SageMaker Seq2seq Model
I managed to train a model with a bigger dataset (4,592,666 records). It took SageMaker approximately 5 hours to train on a ml.p2.xlarge instance. In the end, the results are disappointing, it’s actually has a BLU score of 0 which meant it was even worse than the model I trained with only 11, 000 records.
Some of the outputs of the new model:
pry(main)> SageMakerEndpointService.infer_category('Apple 13.3" MacBook Air')
=> {"predictions"=>[{"target"=>"computers_tablets"}]}
[2] pry(main)> SageMakerEndpointService.infer_category('Ray-Ban Justin RB4165 Unisex Classic Sunglasses')
=> {"predictions"=>[{"target"=>"jewellery_accessories"}]}
[3] pry(main)> SageMakerEndpointService.infer_category('All-new Echo Dot (3rd Gen) - Smart speaker with Alexa - Heather Gray')
=> {"predictions"=>[{"target"=>"audio"}]}
[4] pry(main)> SageMakerEndpointService.infer_category('Shark Rotator TruePet Upright Corded Bagless Vacuum for Carpet and Hard Floor with Powered Lift-Away Hand Vacuum and Anti-Allergy Seal (NV752), Bordeaux')
=> {"predictions"=>[{"target"=>"appliances"}]}
[5] pry(main)> SageMakerEndpointService.infer_category('O-Cedar Angler Angle Broom With Dust Pan')
=> {"predictions"=>[{"target"=>"home_housewares"}]}
These ones are good, but then I get results like below:
[14] pry(main)> SageMakerEndpointService.infer_category('UGET Womens Sweater Casual Oversized Baggy Off-Shoulder Shirts Batwing Sleeve Pullover Shirts Tops')
=> {"predictions"=>[{"target"=>"health_fitness"}]}
[15] pry(main)> SageMakerEndpointService.infer_category('JayJay Women Boho High Low Casual Maxi U-Neck Short Sleeve Tie Dye Print Long Dress with Pocket')
=> {"predictions"=>[{"target"=>"health_fitness"}]}
[16] pry(main)> SageMakerEndpointService.infer_category('RockJam RJEG02-SK-SB Electric guitar Starter Kit - Includes Amp, Lessons, Strap, Gig Bag, Picks, Whammy, Lead and Spare Strings. - Sunburst')
=> {"predictions"=>[{"target"=>"home_housewares"}]}
[17] pry(main)> SageMakerEndpointService.infer_category('Fender F Neckplate Chrome')
=> {"predictions"=>[{"target"=>"health_fitness"}]}
These ones are really off. I am surprised to not see any men or women categories show up. They seem to all appear in health_fitness.
The main problem I saw was a lot of products had multiple categories like men’s cloths belonged in both health fitness and men’s categories. My training data had to do to a one to one mapping and that gave conflicting information. I also noticed quite a few of my data points were outright wrong.
Overall, it was interesting to try even though the results were not great.
My Experience with SageMaker Seq2seq Model
The example for seq2seq model with SageMaker is translating German to English [link] (https://github.com/awslabs/amazon-sagemaker-examples/tree/master/introduction_to_amazon_algorithms/seq2seq_translation_en-de). I thought it might be a good fit for a problem at my current company, Yroo where we don’t have categories for all our products. My theory was I can use the product name and “translate” it into a product category. I prepared a small data sample 7000 training data and 4000 validation data from Yroo’s database.
In short, while the resulting model wasn’t usable in production (Bleu score: 0.2345). It showed some promise in inferring a product category from a product name.
Here are my steps to create a model and use it with ruby code:
1) Prepare the training/validation data
SageMaker seq2seq model requires the data to be in protobuf format and several files:
- train.rec : Contains source and target sentences for training in protobuf format
- val.rec : Contains source and target sentences for validation in protobuf format
- vocab.src.json : Vocabulary mapping (string to int) for source language (product names in this example)
- vocab.trg.json : Vocabulary mapping (string to int) for target language (product categories in this example)
Luckily the German to English tranlation example provided a script to generate the above 4 files
I initially created 4 text files (2 files for training, 2 files for validation). Each set had 2 files:
product.txt
Sony SRSX11 Ultra-Portable Bluetooth Speaker (Pink)
GameWear NFL Indianapolis Colts Classic Football Bracelet
…
category.txt
audio
jewellery_accessories
…
Each line in both files correspond to each other.
I generated the protobuf files with the following line (script provided by SageMaker example):
python3 create_vocab_proto.py --train-source product_name.csv --train-target category.csv --val-source product_name_val.csv --val-target category_val.csv2) Running the Jupyter Notebook
I modified the SageMaker German to English Jupyter Notebook to point to my 4 files in s3. The training only took 10 mins.
3) Using in Ruby
Below is my example method.
def self.infer_category(product_name)
    data = {'instances' => [{
                                'data' => product_name
                            }
    ]}

    sage_maker = Aws::SageMakerRuntime::Client.new(
        region: '[REGION]',
        access_key_id: '[ACCESS_KEY]',
        secret_access_key: '[SECRET_KEY]'
    )
    resp = sage_maker.invoke_endpoint(
        endpoint_name: '[SAGEMAKER_SEQ2SEQ_ENDPOINT]',
        body: data.to_json,
        content_type: 'application/json'
    )

    JSON.parse(resp.body.string)
end

#SageMakerEndpointService.infer_category('StarTech Mini DisplayPort to DisplayPort M/M Adapter Cable')
#=> '{"predictions"=>[{"target"=>"computers_tablets"}]}'
Final Thoughts
With a much bigger data size (1 million+ records), it might be possible to get a much better model.
My Experience with Amazon SageMaker and Integrating with a Rails App
I recently tried Amazon SageMaker, a more hands on version Amazon Machine Learning. I am pretty new to machine learning, but I found it pretty easy to use. SageMaker is a little unpolished/buggy at this time so I will be listing all the problems I encountered and how I solved them.
1) EnvironmentLocationNotFound: Not a conda environment: /home/ec2-user/anaconda3/envs/anaconda3
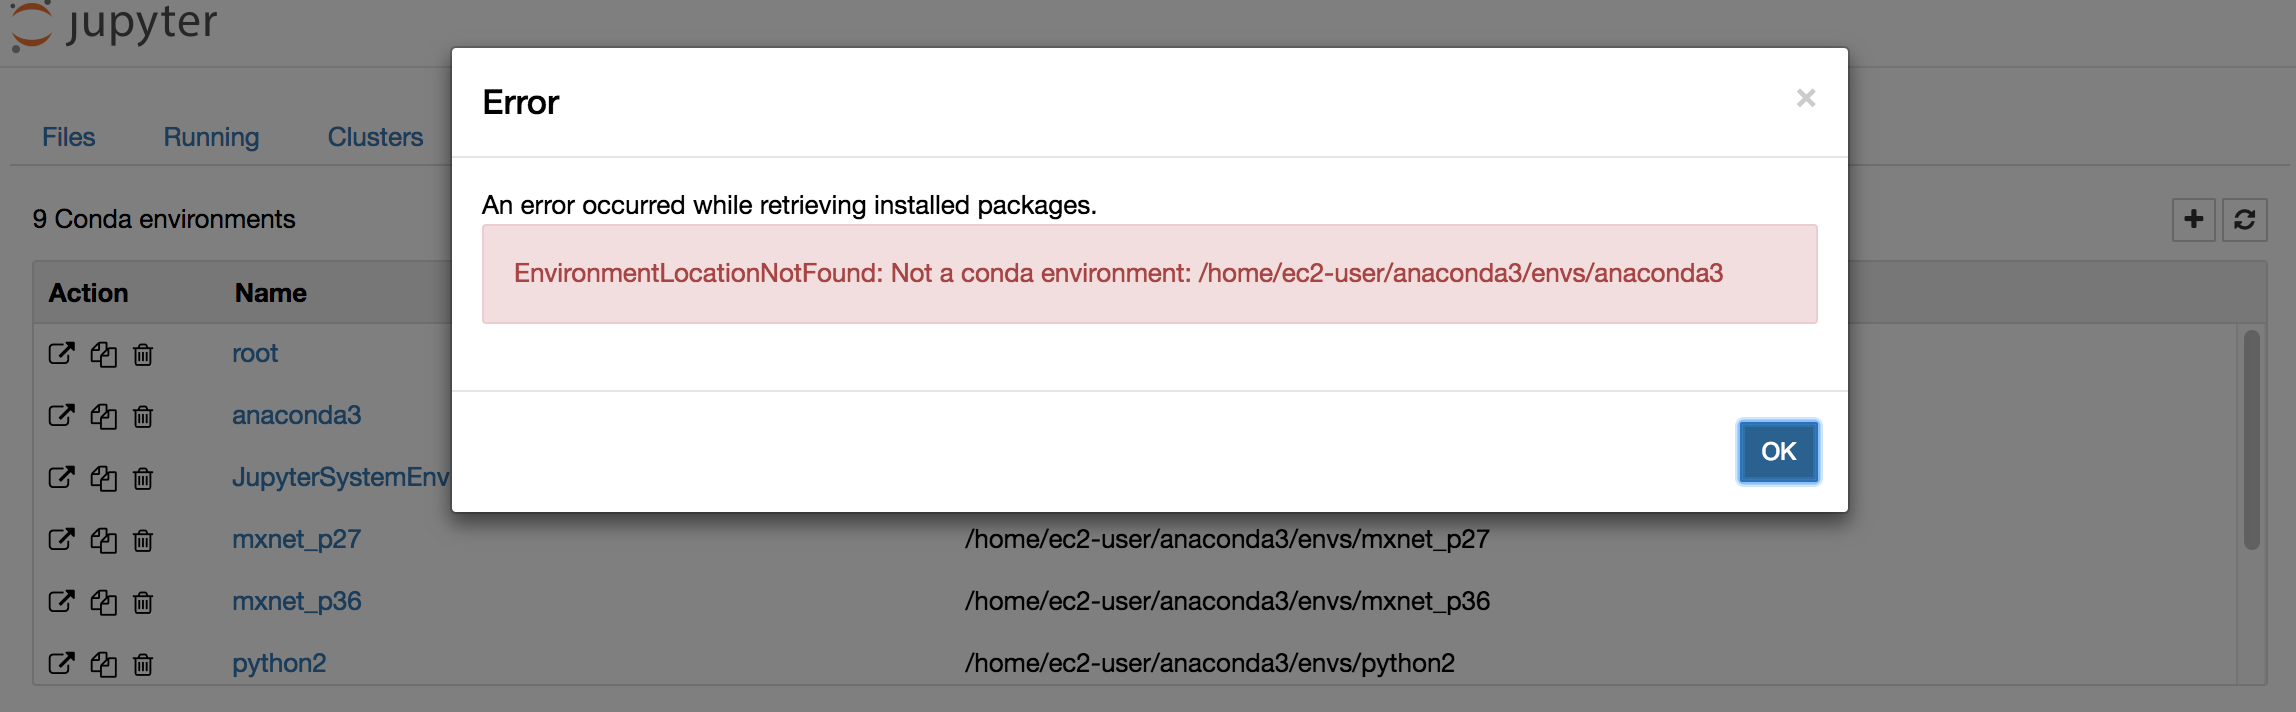
Not sure why this pops up or what it is, but I saw it pop up even in Amazon’s demo video. But this didn’t hinder what I was trying to do.
2) Installing new packages in a Conda environment
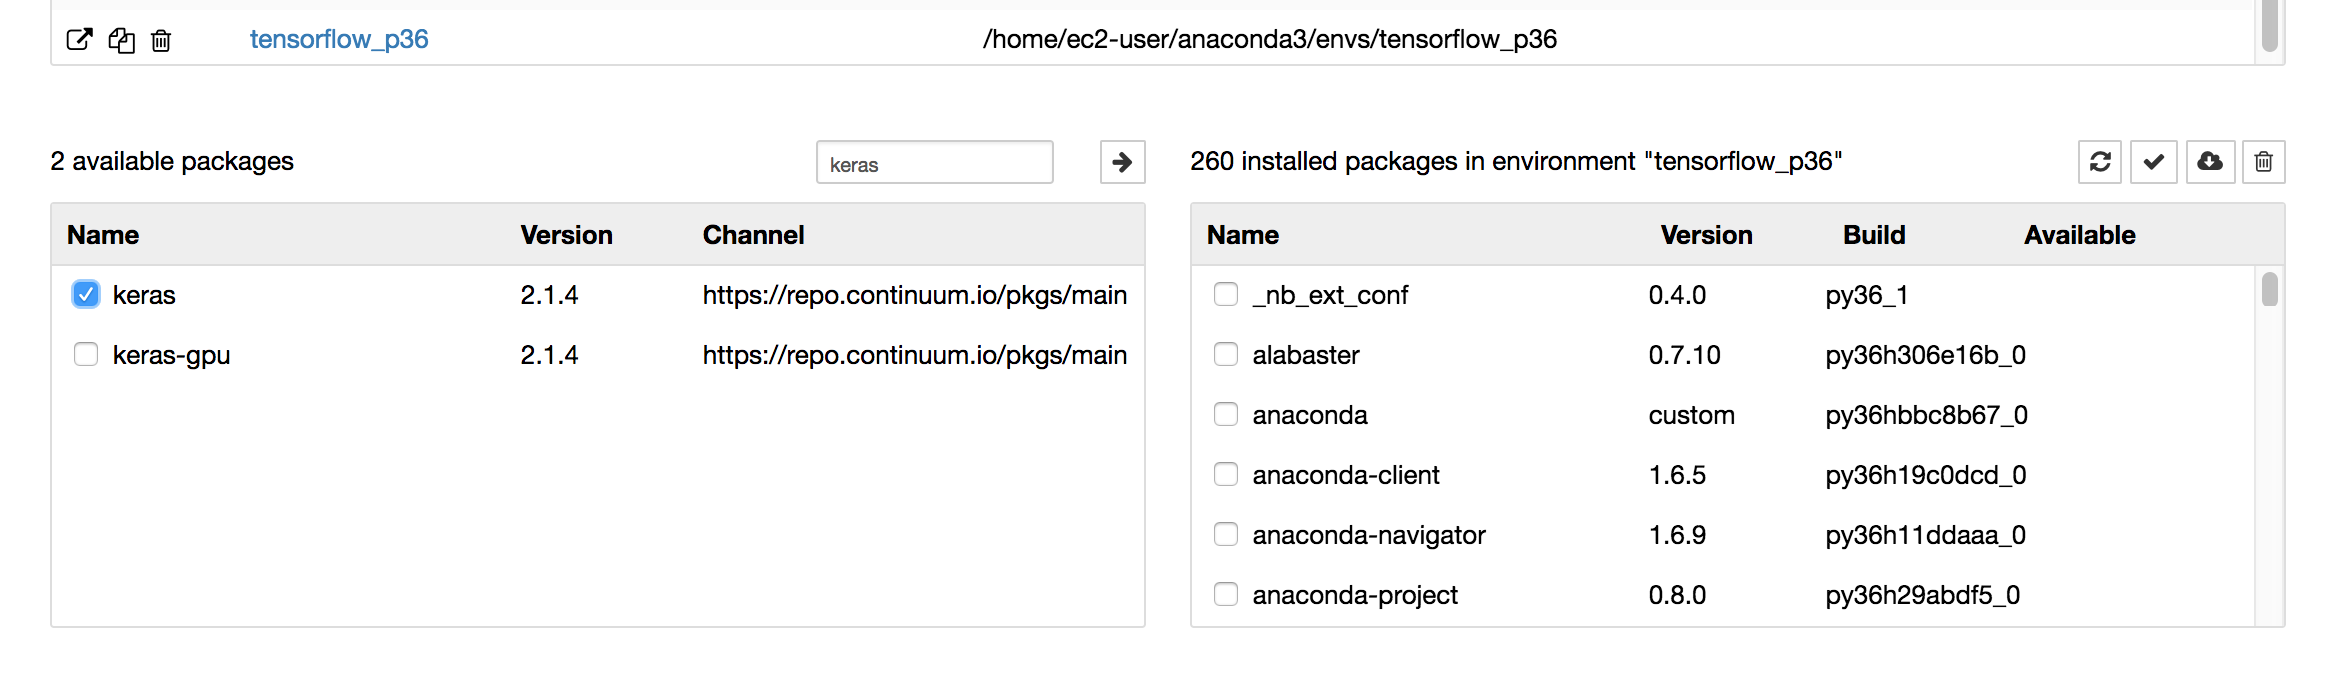
The UI of of the Jupyter notebook isn’t that intuitive, but in order to install Keras, I selected tensorflow_p36 and it showed me what were the installed packages on the right side. The left bottom side is what other packages can be installed. Pressing the arrow on the top left corner, installs the selected package(s) to that environment.
3) Lack of AWS Ruby SDK Documentation
The gem version I am using is 2.11.14. There is a version 3, but the rest of the codebase has not been migrated yet so I stuck with version 2. The SageMaker documentation is here for v2: link , but there’s no example of how to use their methods (ex: invoke_endpoint). I am going to include my simple script to use an endpoint on SageMaker for a model (ex: Linear Learner) I created
sage_maker = Aws::SageMakerRuntime::Client.new(
        region: '[AWS_REGION]',
        access_key_id: '[ACCESS_KEY_ID]',
        secret_access_key: '[SECRET_ACCESS_KEY]'
    )

    data = "2,0,5,0.111146,350,0.159476,531.064,2799,3149,0.111146,350,51.0407,40.3026,0.111146,350,0.0217391,256.684,0.0715644,350,0.111146,787.747,0.219627\n"

    data += "0,0,2,0.3,12.3,0.176471,6.15,28.7,41,0.3,12.3,2.60878,1.30439,0.176471,6.15,0.0217391,6.15,0.15,12.3,0.3,12.3,0.3\n"

    resp =sage_maker.invoke_endpoint({
    endpoint_name: "[ENDPOINT_NAME]]",
        body: data,
        content_type: "text/csv",
        accept: "text/html",
    })

    p resp.body.string
    # => "0.49,0.5" for xgboost
    # => "{\"predictions\": [{\"score\": 0.7134652733802795, \"predicted_label\": 1.0}, {\"score\": 0.7784065008163452, \"predicted_label\": 1.0}]}" for linear learner
Data is all the parameters (in the same order as training the model) to make a prediction on, you can send as many records as you want. I tried over 100 records/lines and it was able to return results for every single one of them in one request. I included sample return strings for Linear Learner model and XGBoost model. It turns out sdk returns different strings from different models.
If there is an error with the call, the sdk actually gives a link to CloudWatch to help debugging.
Final Words
I was able to borrow example tutorials like using the XGBoost model link and easily modify it to produce a model, store it on S3 and create an endpoint for the Rails app to use. It was pretty easy to use overall.